Physical Address
304 North Cardinal St.
Dorchester Center, MA 02124
Physical Address
304 North Cardinal St.
Dorchester Center, MA 02124

This article introduces the foundational concepts and options for integrating GPU acceleration into VMware vSphere environments, particularly for machine learning (ML) and compute-intensive workloads.
As organizations increasingly adopt machine learning (ML), artificial intelligence (AI), and data-intensive workloads, the demand for GPU-accelerated computing has surged. If you’re a vSphere administrator or infrastructure architect, you’ve likely been asked by data scientists, ML engineers, or developers to provide GPU-capable virtual machines (VMs). This article kicks off a series that explores how VMware vSphere supports GPU compute workloads, starting with an overview of the available options and considerations. b
GPUs are essential for accelerating ML tasks such as training, inference, and development. These workloads involve massive matrix operations that GPUs handle far more efficiently than traditional CPUs. The result? Faster time to insights and improved productivity for your teams.
While GPUs have traditionally been associated with Virtual Desktop Infrastructure (VDI), vSphere supports a broader use case known as GPU Compute. This allows users to run GPU-accelerated applications in VMs—similar to how they would on bare metal or in public cloud environments.
VMware, in collaboration with technology partners like NVIDIA, offers flexible GPU consumption models that maximize infrastructure ROI while meeting diverse user needs.
To successfully deploy GPU-enabled VMs, you’ll need to gather information from both your end-users and your hardware/software vendors. Consider:
GPU performance in vSphere VMs can approach near bare-metal levels, depending on the chosen technology. Future articles in this series will dive deeper into performance benchmarks and comparisons. For now, VMware’s performance engineering team has published initial results that demonstrate the viability of GPU compute in virtualized environments.
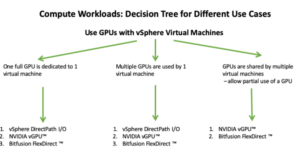
One of the first decisions you’ll face is how GPUs will be consumed in your environment. VMware supports multiple GPU usage models, each suited to different scenarios:
| GPU Configuration | Use Case |
|---|---|
| Direct Pass-Through (vDGA) | High-performance, single-user workloads |
| Shared GPU (vGPU) | Multi-user environments, flexible resource allocation |
| Virtual Compute Server (vCS) | ML/AI workloads with compute-focused GPU sharing |
These configurations are enabled through technologies like NVIDIA vGPU, formerly known as NVIDIA GRID. The vGPU family includes products such as Virtual Compute Server (vCS) and Virtual Data Science Workstation (vDWS), each tailored to specific workload types.
VMware offers multiple GPU deployment models, each suited to different needs:
| Use Case | Technology | Description |
|---|---|---|
| Dedicated GPU | DirectPath I/O | Assigns a full GPU to a single VM. Best for high-performance needs. |
| Shared GPU | NVIDIA vGPU | Allows multiple VMs to share a single GPU. Ideal for cost-efficiency and flexibility. |
| Networked GPU | Bitfusion | Enables GPU access over the network, decoupling GPU from physical servers. |
These options are supported through partnerships with vendors like NVIDIA, offering tools like NVIDIA Virtual Compute Server (vCS) and vDWS.
System administrators should:
In the first part of this series, we introduced the concept of GPU Compute on vSphere and outlined the various methods available for enabling GPU acceleration in virtual machines. In this second installment, we focus on VMDirectPath I/O, also known as passthrough mode, which allows a virtual machine to directly access a physical GPU device.
VMDirectPath I/O enables a GPU to be directly assigned to a VM, bypassing the ESXi hypervisor. This direct access delivers near-native performance, typically within 4–5% of bare-metal speeds. It’s an ideal starting point for organizations transitioning from physical workstations to virtualized environments for GPU workloads.
Ensure your GPU is supported by your server vendor and can operate in passthrough mode. Most modern GPUs support this.
If your GPU maps more than 16GB of memory, enable the BIOS setting for:
This setting is typically found in the PCI section of the BIOS. Consult your vendor documentation for exact terminology.
Use the vSphere Client to enable the GPU for DirectPath I/O:
Configure → Hardware → PCI Devices → EditAfter reboot:
Configure → Hardware → PCI DevicesCreate a new VM as usual, but pay special attention to the boot firmware setting.
Edit Settings → VM Options → Boot OptionsThis is required for proper GPU passthrough functionality.
If your GPU maps more than 16GB of memory (e.g., NVIDIA Tesla P100), you’ll need to configure additional VM parameters.
Steps:
vmware.log for memory mapping errors.This method is best suited for scenarios where dedicated GPU access is required and VM mobility features are not critical.
Some GPUs, like the NVIDIA Tesla P100 or V100, require large memory mappings (>16GB). These mappings are defined in the PCI Base Address Registers (BARs). If your GPU falls into this category, you’ll need to configure two advanced VM parameters:
Edit Settings → VM Options → Advanced → Configuration Parameters → Edit ConfigurationExample:
This ensures the VM can properly map the GPU’s memory regions.
Install an EFI/UEFI-capable OS (e.g., modern Linux or Windows versions). This is essential for GPUs requiring large MMIO regions.
Once the OS is installed, install the vendor-specific GPU driver inside the guest OS.
Before assigning the GPU:
Then:
Edit Settings → Add New Device → PCI DeviceTo ensure stability and performance:
Edit Settings → Virtual Hardware → Memory → ReservationThis guarantees that the VM has exclusive access to the required memory.
After powering on the VM:
If the GPU appears, it’s ready for use in passthrough mode.
To deploy multiple VMs:
You can assign multiple GPUs to a single VM using the same steps. Just ensure:
This setup is ideal for large-scale ML training or GPU-intensive simulations.
VMDirectPath I/O is a powerful method for delivering near-native GPU performance in vSphere. While it comes with limitations (no vMotion, DRS, or snapshots), it’s perfect for dedicated workloads and private cloud replication of GPU-enabled environments.
In the next article, we’ll explore shared GPU models like NVIDIA vGPU, which offer more flexibility and scalability for multi-user environments.
In this third installment of our series, we explore the NVIDIA vGPU technology—formerly known as NVIDIA GRID—and how it enables flexible, high-performance GPU usage in VMware vSphere environments. This article focuses on compute workloads such as machine learning, deep learning, and high-performance computing (HPC), rather than virtual desktop infrastructure (VDI).
NVIDIA vGPU allows virtual machines to share GPU resources or dedicate full GPUs, depending on workload requirements. It’s ideal for environments where:
NVIDIA vGPU consists of two main components:
This setup enables GPU virtualization and management across vSphere environments.
Access the ESXi host via SSH or the shell and run:
Alternatively, use the vSphere Client:
Configure → Hardware → Graphics → Host Graphics → EditReboot the host after changing the setting.
Run: # esxcli graphics host get
Default Graphics Type: SharedPassthru
Shared Passthru Assignment Policy: Performance
Before installation:
Message: Operation finished successfully.
Reboot Required: false
VIBs Installed: NVIDIA_bootbank_<driver_name>
Run: sxcli software vib list | grep -i NVIDIA
This confirms the NVIDIA driver is installed.
Run: nvidia-smi
This displays GPU status, usage, and vGPU profiles.
Run: nvidia-smi -q | grep -i virtualization
Virtualization mode: Host VGPU
If you’re using NVIDIA vGPU software prior to release 9.0, you must disable ECC (Error Correcting Code) on supported GPUs (e.g., Tesla V100, P100, P40, M6, M60), as ECC is not supported in those versions.
Expected output:
ECC Mode

Current : Disabled

Pending : Disabled
Note: ECC is supported in NVIDIA vGPU 9.0 and later, so this step can be skipped if you’re using a newer release.
Once the vGPU Manager is installed and operational, you can assign a vGPU profile to your virtual machine. Profiles define how much GPU memory and compute capability a VM can access.
Edit SettingsVirtual Hardware tabgrid_P100-8q → Allocates 8GB of GPU memorygrid_P100-16q → Allocates full 16GB, dedicating the GPU to one VMWith vCS (Virtual Compute Server) on vSphere 6.7 Update 3 or later, you can assign multiple vGPU profiles to a single VM, enabling access to multiple physical GPUs.
Ensure the driver version matches the vGPU Manager version installed on ESXi.
.run file from NVIDIA’s site (e.g., NVIDIA-Linux-x86_64-390.42-grid.run)Verify installation: nvidia-smi
Edit the license config file: sudo nano /etc/nvidia/gridd.conf
Add:
ServerAddress=10.1.2.3
FeatureType=1
Restart the service: sudo service nvidia-gridd restart
Verify licensing:sudo grep grid /var/log/messages
Look for messages confirming license acquisition.
Use NVIDIA Docker and pre-built containers for CUDA and ML frameworks. This simplifies version management and avoids manual dependency resolution.
Refer to VMware’s guide:
“Enabling Machine Learning as a Service with GPU Acceleration”
You can manually install CUDA libraries and frameworks if containerization is not preferred. Ensure compatibility with the vGPU driver and guest OS.
Ensure compatibility between the CUDA version and the NVIDIA vGPU driver installed in your guest OS. For example, CUDA 9.1 is compatible with the 390 series of NVIDIA drivers.
Use wget or a browser to download the following packages:
⚠️ Always verify compatibility with your driver and OS version before downloading.
Run the installer: sudo sh cuda_9.1.85_387.26_linux
After installation, compile and run the sample programs:
Successful execution confirms that the GPU is correctly configured and ready for ML workloads.